This Spring two students and I have been working in my lab, the Atelier, on a collaboration with Arts@Large.
Arts@Large is a Milwaukee non profit with a mission to integrate arts into Milwaukee Public Schools' classrooms. This fall, they asked me to work with 3rd graders from Hayes Elementary to 3D print the Milwaukee River Basin as part of a larger Wisconsin Watersheds project.
While my hands are a bit full with the four plus classes I am teaching this semester, I thought of a couple talented students I'd been working with who could take the reins on such a project. Meet Ty and Brooke:
These guys are awesome. They have been sponges in my classes - picking up skills really quickly, and learning a lot by experimenting on their own as well.
Check out some of the work they are doing in my classes this semester:
Our first task was to learn a bit about the Milwaukee River Basin (in red below)...
Then, our plan was to use some imaging software to turn a topographical - or altitude - map of that area into a 3D mesh.
We found some great references online, including a color-coded of map the river shed's Elevations.
Using Adobe Photoshop and Adobe Illustrator, we converted the map into a sort of paint-by-number. Brooke and Ty then assigned a number, 1 - 9 (lowest point to highest) to each region.
With much help from Tim Abler, we printed a large copy of the map onto canvas.
With beautiful results! The plan now was to let the 3rd graders at Hayes paint this thing in grayscale. That way, in a sense, they'd be collaboratively 3D modeling with paint.
But in order to do this activity with the kids - there are over 30 of them - we would need a batch of greyscale paints that span 9 values...
The method we devised was by measuring out - across 9 cups - an increasing white amount of white paint and a decreasing amount of black. It was much like writing a for() loop with real material...
Prepping enough paint for two classes of 15.
A quick solution for air-tight paint containers: rubber gloves. This was necessary because Ty and Brooke would need to transport the paint and supplies accross Milwaukee to Hayes.
Brooke and Ty spent two wednesday afternoons working with the kids at Hayes. I couldn't take time from any of my classes - but they did a great job of independently leading this workshop!
Third graders intently focused on the task at hand...
Ty and Brooke showcased the map to me the following day. I was blown away! It was gorgeous, and exactly what we needed to create a 3D representation with some computer aid.
We ended up using a bunch of the recently added tools in Photoshop CC. After photographing the map, we carefully isolated the map. Adding a blur (above) will help smooth out the transition between steps in the model. The resulting mesh looked great, but was missing something...
Brooke, Ty and I decided that, for a river basin map, the river itself was not well-represented. We found a map that highlights the Milwaukee River and surrounding waters, and superimposed them onto the photo of the painted map.
The results were stunning! This addition really transformed the landscape, and much better highlighted the rivers and waters.
We exported from Photoshop, and then cleaned and repaired the model in Netfabb.
A small test print to confirm that the complex mesh doesn't cause any issues in the printer softwares.
Ty and Brooke scaled the model and cut it into printable chunks. We printed these in ABS.
Here are the results - in a variety of colors.
Next, Ty and Brooke sanded the flat faces of each piece, to prepare them for assembly.
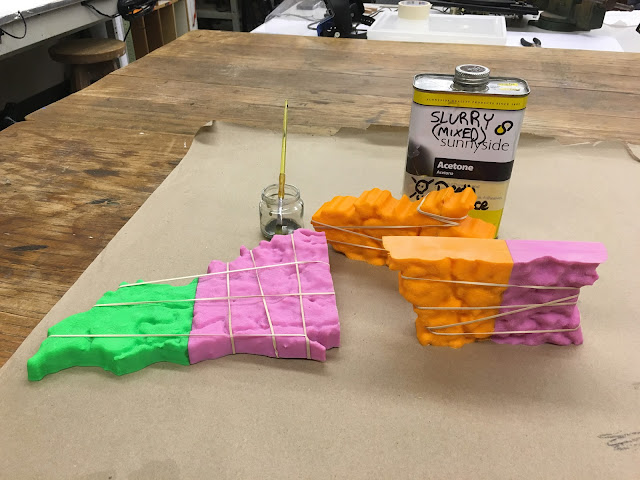
To attach the pieces together, we used a mixture we call "Slurry" - Acetone with a bit of ABS plastic dissolved in it. After painting the slurry onto the edges, we promptly aligned them and held them together with rubber bands.
Ty and Brooke carefully sculpted with marine epoxy to to fill in cracks and small gaps between parts.
For the paint job, they wanted to use a mixture of greens to reference the fact that a water shed actually refers to the land surrounding bodies of water. They began with a base-coat of Rustoleum's Eden in a satin finish. They chose Oregano and Sage for highlights.
While experimenting with some samples to figure out how they wanted apply the different colors, Ty and Brooke stumbled upon a way to create a moss-like effect with the paint. By standing a bit too far back from the print - holding the can 2-3 feet from it, the paint began to dry before settling on the surface of the print. Over time, the dust builds up, creating what looks like fuzz or moss.

Ty and Brooke refined the process - and applied it to the large assembled print.
The final product. This was a huge success! Congrats to Ty and Brooke for doing such a great job with this project, and to Arts@Large for a successful collaboration in the Atelier at Stritch.
Look forward to some professional shots of the model! This will also be showcased at Arts@Large as part of this April's Milwaukee Gallery Night - which I will hopefully have time to blog about!


