Saturday, April 5, 2014
Capacitive Touch Lamp
Back in December 2013 I created a capacitive touch LED lamp to bring as a gift for a White Elephant holiday party. Since the event, I've gotten a few requests to build more of these to sell.
While I typically don't mass produce objects, I am in need to raise money to help fund a trip to China this summer, where I'll be speaking at an international 3D Printing Conference. My plan is to build and sell a limited run of lamps to help pay for my travel expenses.
The original lamp was wired by hand on a solder bread board, and used a voltage regulator salvaged from a car phone charger. While it worked great for a one-off unit, it would become quite tedious to build more than a few lamp circuits using this method.
For the limited run, I have re-designed this circuit to be produced as a home-etched printed circuit board. The toner resist transfer image (pictured above) was designed in Fritzing PCB Editor.
I etched, populated and soldered the first board to check and test the circuit. It works perfectly! The next step will be re-designing the lamp enclosure. These will go up for sale in May - so keep your eyes peeled for more updates!
Iowa Southwest Valley Residency
In January I had the opportunity to be artist in residency at a middle school and high school in Iowa's Southwest Valley.
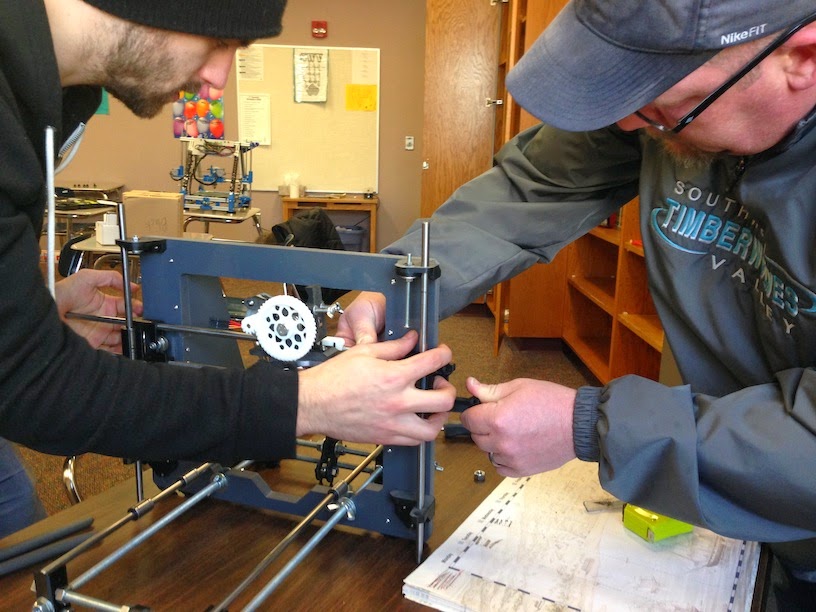
As part of the residency, I led a series of workshops and demos on 3D printing and digital fabrication. While visiting, I also built a custom 3D printer (pictured above - derived from the Prusa I3 design) for the school, in hopes that these technologies could continue to inspire creativity for SWV's faculty and students after I left.
Before heading to Iowa, I prepared some of the parts for the printer. Frankie Flood (founder of UWM's Digital Craft Research Lab) helped me CNC route the framework of the printer, pictured above, from a sheet of PVC plastic I had left over from a past project.
Some of the structural components were prepared in Iowa, as SWV has a very nice and well-equipped wood/metal shop.
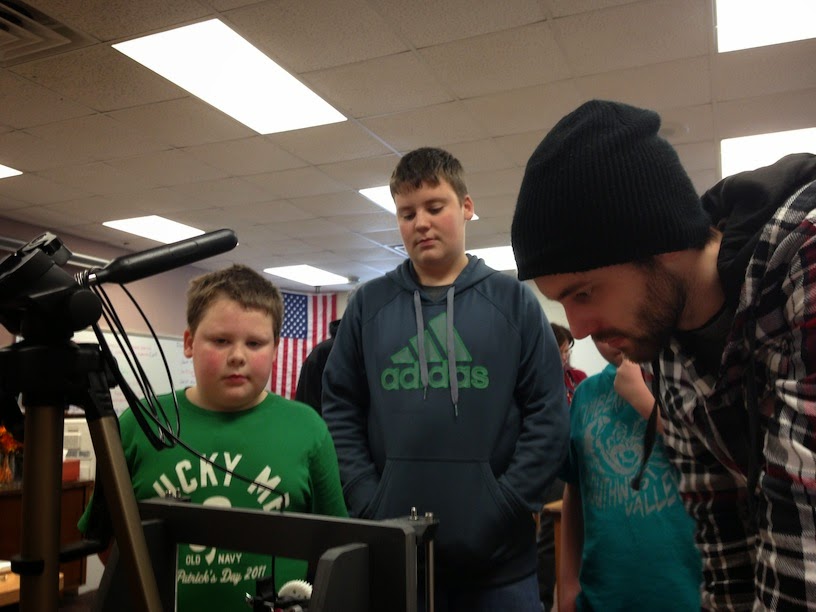
I worked with SWV faculty to assemble and calibrate the printer. Mathematics and Spanish teacher Daniel Mahn turned out to be a whiz with the soldering iron.
During school days I ran a total of twelve demos/workshops with SWV students, and in the evenings I led several professional development sessions with SWV faculty. I trained several faculty members on using the 3D printer. They were quick learners and when I left I felt confident that this printer would get a lot of use in future art and computer science classes.
My re-design of the Prusa I3 was quite successful. It yields beautiful and consistent prints - I will definitely be building more of these in the future. When I get some time to compile all of the design files, I'll be sure to share them on thingiverse.
I had a wonderful time working with the students and faculty at Southwest Valley. I was sad to say goodbye - I made some great friends during my stay, and my experiences from this residency have greatly impacted the way I think about pedagogy and collaboration. Thank you, Southwest Valley, for providing this amazing opportunity.
Saturday, February 15, 2014
Robot Motherboard Meets Servos.
Some servo motors I ordered from HobbyKing finally arrived in the mail. I'll be using these, along with the robot motherboard I designed, for an upcoming robotics / kinetic sculpture project.

I also ordered a batter and charger, in case I want to go mobile with my robot.

The motors I'm trying out are Turnigy TGY-50090M Metal Gear servos, which are relatively robust and about the size of a quarter.
Servos attached to my robot motherboard.
A video demo of a test-run of the initial system. Here I am trying to create power-management code that disables any motor that's not being used - to conserve power as I might be running this guy off a battery.
More on this project to come in future posts!

I also ordered a batter and charger, in case I want to go mobile with my robot.

The motors I'm trying out are Turnigy TGY-50090M Metal Gear servos, which are relatively robust and about the size of a quarter.
Servos attached to my robot motherboard.
A video demo of a test-run of the initial system. Here I am trying to create power-management code that disables any motor that's not being used - to conserve power as I might be running this guy off a battery.
More on this project to come in future posts!
Smell of Red: Solenoid Circuit
My good friend Nathaniel Stern asked me for help with creating a circuit to drive solenoids for a new project he is working on. We decided to fab some PCBs that will utilize a ATTINY microcontrollers and MOSFET transistors to drive solenoids. Above is the toner image (which I designed in Fritzing) printed on toner transfer paper.
Transfered toner resist onto blank PCB, fresh out of the acid.
Resist removed.
Cut and drilled.
Populated.
Video demo of the working circuit (I used an old 5v/1a cellphone charger for a test power supply.)
I also made Nathaniel a shield for easily programming the microcontroller, using an Arduino UNO as an ISP. I designed this for myself last summer, and he liked it enough to ask for one for himself. Happy to help, buddy!
Transfered toner resist onto blank PCB, fresh out of the acid.
Resist removed.
Cut and drilled.
Populated.Video demo of the working circuit (I used an old 5v/1a cellphone charger for a test power supply.)
I also made Nathaniel a shield for easily programming the microcontroller, using an Arduino UNO as an ISP. I designed this for myself last summer, and he liked it enough to ask for one for himself. Happy to help, buddy!
inter|active at the Madison Central Library gallery
Two of my works, Pung and Pixel Tripping, are currently on display at the Madison Central Library Gallery as part of the inter/active exhibition. Other artists in this show include Nathaniel Stern, Meg Mitchell and Kemper Smith.
For more information, check out the gallery's facebook page for the event.
Sunday, February 2, 2014
DIY Drill Press
Since I've been fabricating a lot of printed circuit boards for some new electronics/robotics projects, I needed a drill press for finishing PCBs and for smaller, more delicate drilling operations.
Introducing the Flex-Press Print! After looking at some drill press designs, including my crappy Press and a couple from Stritch's metals shop, I decided I could design my own press to be 3D printed.
**Update: Per suggestion by Google User Mike M, I am including a link to the drill press stand that inspired this design - in case you are interested in buying one, rather than building your own - but also to give credit to the original design. Check it out, here.
I had an extra flex shaft tool, so I designed it around that. A similar one could be purchased here.
The design also features LM10UU 10mm linear bearings to ride up and down a 10mm diameter shaft.
My studio mate, DeLandTree, inspired me to include a time lapse of my initial drawing for this design. Check out his latest time lapse cad session here.
I decided to design this to print on my Mendel Max printer because: a.) it would be fast, b.) it would be a design worth sharing, c.) it could easily be designed to be printed with zero support material.

I published this design on Thingiverse, here. Above is all of the parts fit onto one 190x170mm build plate, tho I actually printed each of the parts individually.
The first print: the z-axis clamp. This includes a small 1/8"x10 ruler for depth specific drilling, as well as a nut-trap for a bolt to act as a clamp on the 10mm shaft.
For the base of the press, I decided to try a little experiment. Though the base of the press needed to be sturdy and heavy, I designed it to be hollow.
And laser cut a "lid" to screw on top of it.
Then, I used hot glue seal the seams.
Next, I began to fill with concrete.
I sprinkled in some extra bolts to add some weight.
The base, filled with concrete. I attempted to add some flange nuts so I could anchor this to a table in the future; all but one sank below the concrete (sigh.)
The completed base.
Tho I didn't include images here, the other two parts came out near perfect on the first try. Also - I tweaked all of the designs to compensate for little bugs before uploading to Thingiverse.
For levers, I cut, bent, and filed some .125x.5x" aluminum strapping.
Drilled and tapped.
Plasti-dipped the handle lever to maximize drilling comfort.
The completed press!
Introducing the Flex-Press Print! After looking at some drill press designs, including my crappy Press and a couple from Stritch's metals shop, I decided I could design my own press to be 3D printed.
**Update: Per suggestion by Google User Mike M, I am including a link to the drill press stand that inspired this design - in case you are interested in buying one, rather than building your own - but also to give credit to the original design. Check it out, here.
I had an extra flex shaft tool, so I designed it around that. A similar one could be purchased here.
The design also features LM10UU 10mm linear bearings to ride up and down a 10mm diameter shaft.
My studio mate, DeLandTree, inspired me to include a time lapse of my initial drawing for this design. Check out his latest time lapse cad session here.
I decided to design this to print on my Mendel Max printer because: a.) it would be fast, b.) it would be a design worth sharing, c.) it could easily be designed to be printed with zero support material.
I published this design on Thingiverse, here. Above is all of the parts fit onto one 190x170mm build plate, tho I actually printed each of the parts individually.
The first print: the z-axis clamp. This includes a small 1/8"x10 ruler for depth specific drilling, as well as a nut-trap for a bolt to act as a clamp on the 10mm shaft.
For the base of the press, I decided to try a little experiment. Though the base of the press needed to be sturdy and heavy, I designed it to be hollow.
And laser cut a "lid" to screw on top of it.
Then, I used hot glue seal the seams.
Next, I began to fill with concrete.
I sprinkled in some extra bolts to add some weight.
The base, filled with concrete. I attempted to add some flange nuts so I could anchor this to a table in the future; all but one sank below the concrete (sigh.)
The completed base.
Tho I didn't include images here, the other two parts came out near perfect on the first try. Also - I tweaked all of the designs to compensate for little bugs before uploading to Thingiverse.
For levers, I cut, bent, and filed some .125x.5x" aluminum strapping.
Drilled and tapped.
Plasti-dipped the handle lever to maximize drilling comfort.
The completed press!
Subscribe to:
Posts (Atom)